Monday, October 19, 2009

Miss Manners

I never really thought the marriage process would change me much as a person. Sak and I have been together nearly six years now, what's one day going to change?

A lot.

There's a ton of changes that come with being engaged. There's a whole new vocabulary to learn, a new internet niche to explore, and expectations and relatives I never even knew existed.

One positive change, however, is the introduction of manners. Etiquette, prompt thank you cards - once a nuisance to my spare time, now something I kind of enjoy.

Take these for example:
Way-Cute Hallmark thank you cards! I bought them to send out to the lovely, generous friends and family that have been helping me out with planning bits and pieces so far. And sadly, had the wedding gurus out there not pounded in the importance of plentiful thank you's, this is something I would not have done.

Thank you wedding-gurus, whoever you may be!

But on that note, what would the perfect thank you cards look like? Would they match the invitations? A cute picture of the two of us on our wedding day? Another comic? A pre-made card? Like these pretty cherry blossom cards at Target:
I'm sure there's plenty more out there. Chalk this one up under the "needs more research" category. But even if I haven't had that "a-ha!" moment on this detail yet, it's still fun to think about!

How are you thanking your guests post-wedding? Did you decide on a card beforehand, or leave it as a much-needed post-wedding project?

Saturday, October 17, 2009

Raised Paper Riot!

On our journey Sak and I also walked into a store called Paper-Source. Mostly on a whim, to see what kind of paper options we'd have for invites and such.

We were blown away! The paper was so pretty, and they had idea books laid out with samples. Now, I kind of already had an idea of what how we'd make our invites, but there was one thing we saw that completely threw me for a loop:

(click image for source)

Embossed paper! Isn't it amazing?! So pretty!

We had to have it. But, the price is a little steep! $18.50 for 20 sheets? eep!

So in order to solve any problem, we must first lay out our options:

1) Pay $18.50/20sheets. At about 100 invites, that would be $92.50
2) Buy a cuttlebug and make my own embossed paper with preset templates. This would be about $50 plus the cost of store-bought cardstock. They don't make a cherry blossom template.


3)Heat Embossing. Would have to pay for cardstock, a rubber stamp, embossing powder and heat tool(~$25).


They all look like fun to me! We'll have to sit on this one for a while, I think!'

Anyone else in love with embossed invites? Did you make your own, or buy them pre-made?

Thursday, October 15, 2009

The Dream "Dress"

Three of the last four weddings I have attended have involved Asian brides. And you know what that means, right? Dress changes!

Though I may only be half-Asian, I fully look forward to and embrace the tradition of changing one's dress several times throughout the reception. Indeed, I had it all planned out. In addition to my traditional white gown and Chinese cheongsam, I would also wear a uchikake - the Japanese wedding kimono.


Ohh how I shivered in pure delight just thinking about it. It was (and still is) more exciting to me than wearing the traditional wedding dress. And imagining my Sak in his own mon-studded kimono was..well, drool-inducing (for me, anyway)!
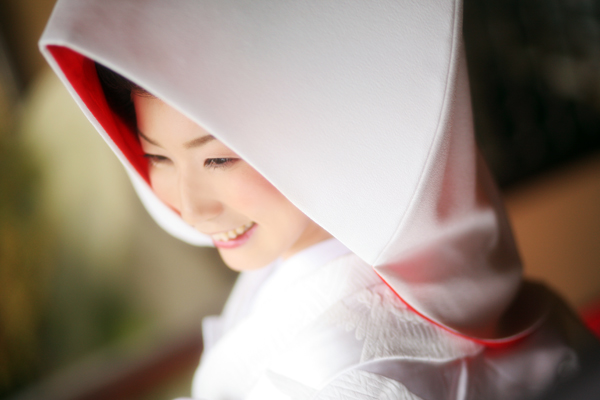
(However, I don't think I could wear the hat, as it symbolizes the "hiding of one's horns", a.k.a. the stubborn jealousy and ego of the single woman. It, in a sense, represents her obedience to her husband. I'm not very obedient. I guess I could work on it, but Saka knows my "horns" aren't going away anytime soon..)

So since mom-saka and dad-saka just so happen to be living in Japan at the moment, I called them up via Skype excitedly. His mom answered, and I told her my grand-master-plan involving hundreds of pounds of brocaded white silk.

She laughed.

No way, she said. Wedding kimono are just way too expensive. Even more expensive than western gowns. And besides, they take hours to put on, when would I have time for that at the reception?

Perhaps noting my crest-fallen face through the webcam, she gave me the name of a rental store on Oahu, suggesting that we might be able to rent for pictures before the wedding.

So all was not lost.

I looked the rental store up, fell quickly in love with their options, and then looked at the prices.

Seven-hundred-and-fifty dollars. Over seven times the cost of my home-made gown. For a rental. That you don't even get to take out of the store. $750 for both bride and groom to be dressed up, traditionally styled, and taken pictures of in their photo studio. That means I wouldn't get pictures in front of here:

The beautiful Byodo-in temple. (Brother-Sak and Sak pose in the foreground)

I whined for a few days, but the Japan-phile in me is far from giving up. If I can't wear the uchikake, I can at least wear some other type of kimono, right?

My second option is the furisode - it still has the beautiful brocade silk, but minus the bridal "umph".


And the third choice, which Sak has already asked his parents to look into sending, is the yukata. No pretty silk, but rather a summery cotton. It will work for engagment photos, but I wouldn't wear it in the reception dress-changing fest. We can, however, reuse them after for all those summer obon festivals!


So will I find something to wear for the reception? Or will I be stuck as a two-dress bride? I guess only mom-saka has the answer to that.

Anyone else wearing multiple dresses during your reception? (Or, does anyone have an extra uchikake lying around that I can borrow? *sigh!*)

**As always, click the images for the source!**

Wednesday, October 14, 2009

Lotus Love

Since the glass double-happiness tealight holders are too fragile to make the trip to Hawaii, we needed a suitable alternative. What can go through the mail (or the airport), undamaged and in a relatively small amount of space?

Paper!

Sak, as many know, is a master of origami. One of his many talents, and one that unfortunately goes unappreciated most of the time.

Sak: Look, I made a dodecahedron-geometrical-ball-shape from 78 pieces of your expensive engineering paper!*

Penga: Great, like what am I going to do with that? *tosses*

*not a direct quotation, of course

Well, surprisingly, my sentiments towards the paper craft have changed dramatically now that I am finding uses for them!

A quick online search of "origami flowers" popped up exactly what I was looking for (click picture for source):

Origami Lotus Flowers!

The perfect tealight holder!

I found some instructions here, and set Sak to the task of recreating them.

He made three flowers to experiment with...

First with only one sheet of paper...(fail)

Then with some sheets of plain white printing paper...Looks like a good size!


Finally with that expensive red washi paper!

...Just open the petals up a bit, and voila!

Just 59 more to go! I know paper flowers are an *in* thing at the moment, anyone else using an origami version?

Tuesday, October 13, 2009

Bag Bliss

Previously on The Saga of the Magical Chair-Cover-Eco-Bag-Favor...

We had a sizing issue. If we were to make a couple hundred bags, it would be nice if they actually fit on the chairs in Hawaii, right? Well, I emailed the venue to ask what the dimensions were. They gave me a few numbers, but recommended I save myself some time by simply renting covers. Unfortunately, when in DIY-mode, practical advice falls on rather deaf ears.

Now, it's not that I don't trust their measurements; I'm sure they are correct. It's just, I need to visually see the "end product". For example, you can calculate and order a certain-sized part for a job, but you never really know if it will work out until you see it in action.

There's a reason you can never do a worksheet without this baby:

|(Theoretical - Actual)/Actual| * 100 = % difference


So we made up three different-sized samples to try out.


I tagged each different bag with a number, and we'll ship them out to Saka-Aunty.

#1 - 16" x 22", squared corners. The square corners are the easiest to sew, and look more "bag" than "cover". But I am worried that these corners might flop around too much on the round chair.

#2 - 18" x 22", rounded corners. The reason we have two at the 22" length was because that required the least amount of cuts to the initial fabric. We're thinking mass production here!

#3 - 17" x 17", rounded corners. This one is my favorite, as it looks most like a bag. I put a strap on this one, to simulate what it might look like. The actual strap will probably be nylon or something more sturdy.


She'll then go down to the venue and try on each sample real-time. She's so awesome! Hopefully our % difference is as close to zero as possible. But since there will always be a difference - with her judgement we can fine-tune the measurements before starting on mass-production.

The goal being to finish all 200 before we go to Hawaii this Christmas.

Do you have any projects where your expected measurement varied significantly from your actual? This might apply to dress sizes and budgets as well!

Monday, October 12, 2009

Styling the LIttle Sis (Take 2)

When we last left off, I thought Danni would go for the little mini-Mic dress - the red ballgown.

After reading the entry, and reviewing her choices, Danni decided she could do better. She could design her own dress.

Here's her artistic vision:


Sassy, eh? I must know - what kind of belt is that? A buckle in the front and a flower in the back!

I'd love for her to wear something she feels extra special in, but unless she gets some family-talent support, I'm not sure if I could promise it to her. In the meantime, I'll have to keep searching for a pre-made dress that meets all her criteria!

How are you helping your attendent(s) fall in love with their dress(es)?

Saturday, October 10, 2009

Adventures in Yudu

*Ding*

"Round One! Ready.... FIGHT!"

Let's examine the process of YUDU screen-printing, shall we?


First we printed out our stencil. This took, oh, about THREE tries, due to our printer's refusal to cooperate. We decided to go for the heart instead of the rebel alliance symbol. I'm a little sad about it, but Sak thinks it's best to confuse as few people as possible.

(Not pictured are the steps we took to burn the stencil into the emulsion. Just follow the directions, and make sure everything is 100% dry!) We set the finished screen in the Yudu and taped down the parts we don't want to ink just yet.

Next, we flooded the screen with ink.

Then Sak scraped the design onto the fabric! We did a total of 6 passes with a Ralph's grocery card.

Lift the screen up, and here's the design! Not so bad, actually.

...But after it dried, the ink disappeared! Ah! Maybe we should use a different color?

We tried the main design with the an opaque white ink instead. Much better!

...But still not perfect. I think I used too many scrapes on these, as you can tell be the bleeding. We'll get there yet!

How much trial-and-error did you have to go through before achieving perfect results? Or did you end up changing your definition of perfect instead?