Showing posts with label wedding invitations. Show all posts

Wednesday, September 15, 2010

One Day Invitations

You thought I was done, did you? Oh ho ho ho. Unfortunately - no. With the at-home party practically weeks away, it was time for this happy honeymooner to get her heads out of the clouds of anime and back down to business.

But we took a few shortcuts this time.Michael's ready-to-go invitation kits. I feel like a bad DIY blogger just writing that. But I'm married - I can do what I want! I picked up two packs with 40% off coupons, and was pleasantly surprised that they came with everything needed, even down to the little tape dot to fix the belly band in place.

We printed out the cards, with who-knows-what wording. There's not a whole lot of examples for second-invite wording, so I just made something up. It's probably an etiquette nightmare, but I figure it's better to let our guests know about this party before it happens, rather than spend the extra time stressing over wording.

And then, of course - I did stress. The whole thing felt "off" to me because there was pretty much zero work involved. I can't escape the bug, it seems.

So I decided I would add a vellum overlay, punched with a pretty border design. Sak and I had a hard time finding bulk vellum on-the-spot on a certain 8 PM weeknight though - so I picked up a couple pads of cheap tracing paper from Office Depot instead. It's not as durable, of course, but it gives the same translucent effect.
Sak went to work heat-embossing the envelopes; a job he luckily doesn't mind. I was happy for a chance to use some lotus stamps I had dug up from the dollar bin. You know, since I have officially declared the lotus my favorite flower ever.
But before you think that it was all smooth-sailing - let's introduce the Martha punch. Sure, it has a ridiculously cute design, but the thing has a handle straight from hell. I have bruises on both palms now due to the non-friendly, pathetic excuse for a lever.
That, and it refused to cut through my thin tracing paper without tearing. I solved that problem by sandwiching three sheets of tracing paper between sheets of scrap printer paper. Old college notes certainly came in handy!

And then! Then the whole contraption decided to get stuck in the "pressed" position. The springs that lift the punch refused to pop back up, and I could not jiggle it around to free the horrible little thing. Solution? A hammer, straight to the backside of the punch.
It worked, but somehow I don't think it was made to be hammered after every use. I looked for tips online, and found that punching through wax paper can help keep the device from sticking.It worked! Thank goodness for the internet.
After punching out some very pretty tracing paper, I slipped it inside the invitation, and we sealed the envelopes up. No RSVP cards this time, everything will be done online. Supposedly.

Eighty invitations, finished in one day! It's possible!

Are you using pre-made invitation packs at all? They certainly are less time-consuming and stressful than DIY!

Sunday, June 13, 2010

Numbers and Notes

Planning a destination wedding? Well, there's one thing they always tell you - be prepared for many "declines". Obviously, it's not easy for people to just jump on a plane and romp on some island for a week.

I guess it's good advice, since our wedding is no exception to the general rule. Here's the numbers:


Egads! Only 40% of our loved ones are actually coming!

At first, I was irrationally upset. Every "no" RSVP depressed me, and it got to the point where Sak would have to open the envelopes - I couldn't stand to see the bad news. The declines, in conjunction with the "why are you having your wedding there" statements, felt like personal "I don't care about you" messages. And it hurt.

However, with time and Sak's ever-rational explanations, I eventually came back to reality. Just because many people can't come doesn't mean they love us any less. It doesn't mean they disapprove of our union. It simply means that they can't come, and I don't need to know why. Instead of moping over who isn't coming, I'm just thankful for those that are attending. And I'll come back and re-evaluate our numbers again after the second reception, where hopefully the missing ~60% can attend!

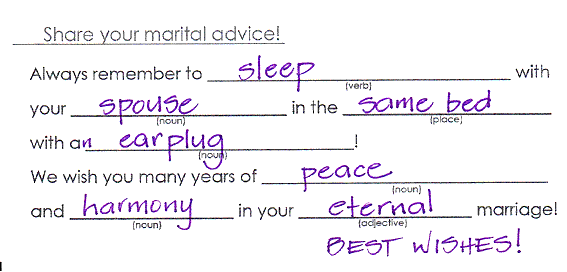
Now, on a more upbeat note, we got some great responses back with our mad-lib RSVPs! The weird and random cards were our favorite, as you can probably guess:
This captures us perfectly!

And sadly, I'm probably more of a snorer in this relationship.

I like the Freudian slip here.

Whoa there. And as an interesting side note, many of the other cards mentioned underwear as well. What's with that?

Bad advice, indeed!

Sak thought I should include at least one sweet one, just so you don't think all our friends and family are abnormal.


Anyway, I'm really glad we did the mad-libs, even though not everyone filled them out. Oh, and speaking of not filling things out - of the 115 invitations we sent out, we had 50 not respond either by card or the wedding website. That's a whole 43% that we had to call and e-mail for an answer. And Sak would like me to mention that the lack of etiquette came predominantly from one person's side of the family. And that person shall remain nameless.

What kind of numbers do you expect? Did they turn out like you thought? And can anyone beat my 40% for worst acceptance percentage?

Saturday, April 17, 2010

Manvites: Re-Imagined

You thought we were done, right? Think again.

I sent out 100 finished pocket fold manvites - only to realize that the guest list wasn't exactly finished. Yep, there were to be about twenty more additions, to be specific. These things happen.

Unfortunately, I didn't have any extra pocket folds ready-to-go. And Sak was too busy working on the dress to be bothered with more time-consuming pockets. And we were also fresh out of white glue sticks for seal making.

Well, why not modify the design a bit? It will help both as a way of handling my lack of materials and also my lack of motivation. Fresh ideas are always a good cure for laziness.

I started by introducing some red linen paper, to make the package a little more colorful than last time. Since there was a lack of pockets for the inserts, I decided to try making a little folder instead. I punched holes at the top to keep the inserts inside.


I finished off the folder with a swirly embossed edge, and placed the inserts inside.


After mounting the main invitation card onto a plain rectangle of black linen paper, I tied it together with the insert folder and a stamped RSVP envelope.


I think the little ribbon feels a lot more feminine and cute than the wax seal did, which is ironic since most of these extra invites are going to men.

Anyone else have an ever-expanding guest list? How did you handle the second wave of necessary invitations?

Sunday, April 11, 2010

Manvites: Enveloped

Even though our main invitation card was a YUDU-fail, I still wanted to use the device for something. So I picked a bigger font, and Sak went to town squee-geeing our address to the response card envelope.

Then, once he finished, he went back and added a mon to the side. He first tried to do both the mon and the symbol at the same time, but they just weren't coming out at the same consistency. Either the mon would be over-saturated, or the words would be too light.

Luckily, YUDUing paper seems to be a faster process than fabric, since it only needs one swipe to transfer the image. It didn't take too long to do both the words and the image separately.

Pleased with how the response envelopes turned out, we decided to screen-print the main envelope as well. This time with just the mon design. The return address is computer-printed to the back envelope flap.


One tip Sak has for paper printing - use a magazine or cardboard or something to lift the paper closer to the YUDU screen. Since the YUDU is primarily designed for fabric printing, there's a little bit of a gap to account for fabric thickness. Paper, obviously, isn't as thick, so you might like to give it some padding for a more accurate transfer.

Next, we cut out some envelope liners from cheap red wrapping paper, and double-stick-taped them in. One note about white envelopes - I originally wanted to use the trick of half-sized liners to conserve paper, but with a white envelope, it was see-through! So the liners had to be full sized.


Penga-Mom did all the calligraphy on the front with a chisel-tip calligraphy pen, and we used both the 2010 Chinese New Year stamp and wedding band stamp for postage. Though we used $0.88 per envelope, we technically only needed $0.81 according to the postal worker.


It pains me to white-out parts of the envelope, since Penga-Mom did such an awesome job writing them!


I'm not really sure which part of Sak's manvite is my favorite. I'm thinking either the wax seal, or the shiny outer envelope with fancy calligraphy. But in any case, that's it! Time to send these manvites out! I hope they come back with many "yes" cards!


Final Cost Breakdown:

From Pocketfold building:

Black linen card stock: $42.26 for 250 sheets, or $22.65 for 134 sheets used.
white linen card stock: $32.79 for 250 sheets, or $3.28 for 25 sheets used.
double happiness stamp: $3.50
embossing gel: ~$4.00
embossing powder: ~$2.00
spray glue: ~$10.00
red washi paper: $3.00
Subtotal: $48.43

From Inserts:
White Linen Card Stock: $32.79 for 250 sheets, or $10.49 for 80 sheets used (Extra 20 account for spelling error)
White 4 Bar Envelopes: $13.94 for 250, or $8.36 for 150 used (Extra 50 account for YUDU errors)
RSVP Postage: $45.00 for 100 stamps ($1 for shipping and handling)
Subtotal: $63.85

From Wax Seals:
Wax Seal: $14.90 (with shipping)
Glue Sticks: ~$4
Ribbon: ~$18 for six spools
Subtotal: $36.90

From Outer Envelope:
White A-6 Envelopes: $43.40 for 250, or $21.70 for 125 used (Extra 25 account for YUDU errors)
Invite Postage: $88.00 for 200 stamps
Subtotal: $109.70

Grand Total: $258.88, or $2.58 per invitation.
Not too shabby!

What was your favorite aspect of your invitation suite?

Tuesday, March 16, 2010

Manvites - All Sealed Up

Along with Sak's desire for no-doodle manvitations, there was another wish he had on his list of things that are formal.

Wax.

I agree with him. A wax seal screams "formal". So to realize his vision, I bought Sak a little double happiness seal, and found some white gluestick wax at the now-closed Pearl Art Store in San Francisco to go with it.

In addition, we purchased some red ribbon, and cut it into 100 ten-inch strips to wrap around our pocket fold.

Now, there's already a great thread going around on the boards with tips and tricks for glue-gun wax seals, but I'll show you our process as well.
First, Sak created an elaborate setup (that's probably completely unnecessary). He took a baking pan and placed an ice pack inside. Then he covered the ice pack with a loaf pan, creating his "working surface".

He also used a measuring cup full of ice water. The ice-water was used to chill his metal seal before and after each application.

He simply pumped a few squirts of glue onto his cold surface, and then plopped his ice-chilled seal into the puddle, holding it there until the glue set.

Once set, he pulled the seal out, and peeled the seal off the surface to fully dry. It's that easy!

Now, he chose not to glue the seal directly on the ribbon belly band since he didn't want to mess any up on accident. There were quite a few screw-ups at first.

He tried melting the mess-ups down to reuse the wax, but it created a sputtering hot mess. I don't suggest it.

Gathering materials, it was now time to attach ribbon and wax to the cards!

To attach the pre-made seals, we first glued the ribbon together with normal hot glue.

Then we added another hot-glue dot, and placed the seal on top!

Not too shabby!


Cost Breakdown Thus Far:

Total from previous steps: $112.28
Wax Seal: $14.90 (with shipping)
Glue Sticks: ~$4
Ribbon: ~$18 for six spools (we needed five, but one spool was cut incorrectly)

Total so far: $149.18 or $1.49 per manvite.

Any wax seal guys or gals out there? real or faux - what's your preference?

Saturday, March 13, 2010

Manvites: In the Cards

Our pocket folds contain three white linen cards. Front and back, no doodles and my own psychological aversion to white space? Smells like trouble.


First, the reception card:

The printed map (line-art traced from a google map), is a little hard to read since it is small, but as Sak points out (and I have edited his exact words to preserve his nice-guy image),"Our guests are smart enough to know they should just type the address in their GPS or Google. The map is just for visual flair."

And the back:
Acckk! The white space! Make it die!


Next, the accommodation card:

Hotels, ah, hotels. How I loathe thee. I blocked off rooms at a few hotels, actually. Budget friendly ones. And then Penga-Dad chimed in, "If you pick a junk hotel, everyone is going to blame you for it!" And he's totally right. I hadn't actually stayed at the hotels I blocked, so how would I know other than by reviews? So in frustration, I changed the words to "There are five billion hotels in Waikiki. Pick one 'cause I'm not your travel agent." But putting links to review sites seemed much more productive.

Though despite my hotel cop-out, Penga-Mom is still a little worried - she'd like her friends to all be able to stay within the same vicinity so they can party together. And I totally understand that. So I'll be putting more information about where the wedding party will be staying on our website. I'd put it on our cards now, but unfortunately we still haven't decided where we'll be staying.

And the back:

This was actually fun, as you can tell by the minuscule amount of doodling I was permitted. Sak and I tried to think of all our favorite Oahu things, in addition to the normal touristy ones. The beach with coconuts is probably my favorite of the non-touristy things. I'm not sure where they come from, but there's a ton of coconuts that wash ashore. Most of them are rotten, but sometimes you get lucky. We found a dead fish and an uncooked turkey there on our last visit. Take that, tourist beaches!

Oh - but wait! One problem with the accommodation card. I spelled accommodation wrong. Brownie points for you if you caught it! Sak was livid. I half just wanted to leave it be, but we re-printed and cut all 100 of them with the correct spelling. Spellcheck is your friend!


Lastly, the RSVP card:

And the back:
I'm a sucker for mad libs, so I'm hoping we'll get some good "professor plum in the library with the knife!" responses. I'm not sure who I first stole this idea from, but seeing as my wording ended up fairly similar to Mrs. Gloss's, it was probably her.

We also remembered to number our response cards with invisible ink, to sleuth out anyone who forgets to write their name in!

The answer!


We'll throw the RSVP envelope into the back, which was painstakingly YUDUed in shimmery red ink by Sak. (More on envelopes later!)


A decently stuffed pocket, if I do say so myself.

Next we'll wrap this manvite up!

Running Cost Breakdown:

From Previous Pocket-Fold Building: $48.43
White Linen Card Stock: $32.79 for 250 sheets, or $10.49 for 80 sheets used (Extra 20 account for spelling error)
White 4 Bar Envelopes: $13.94 for 250, or $8.36 for 150 used (Extra 50 account for YUDU errors)
RSVP Postage: $45.00 for 100 stamps ($1 for shipping and handling)

Total so far: $112.28 or $1.12 per manvite. Lesson learned? Messing up can get costly! So catch your errors early on!

What's the weirdest thing you've ever found on a beach?

Wednesday, March 10, 2010

Manvites - DIY Pocketfolds

Building up from the bottom, let's create some manvites!

We'll start with some black 8.5" x 11" linen card stock. Cut it down to 6.25"x 11" and slap a nice bold stripe of red washi paper on. Since the washi paper is so-very-thin, use spray glue to keep it from warping.
Cut out a 6.75"x 3.25" pocket with notches and everything. I'm so glad I don't have to do this part, just looking at all the angles gives me hand cramps!

Emboss a double happiness stamp to the corner using embossing gel and clear powder. We experimented with black, white and red powders, but clear seemed to look the least obtrusive. Plus, it's harder to spot mistakes when you use clear powder! Sak's tip for fast embossing is to stamp and apply powder to several pockets, assembly line style. Then line them up and wave the heat gun over all of them at once. (Note: If the sizes look "off" in the below pictures, it's because they are from our practice runs!)


Score the pocket fold! If you don't have a scoring blade your paper cutter, use an empty ball point pen and a ruler instead. It works just as well!
Next, glue the pocket onto the card using Zip Dry. The glued pocket fold needs to dry flat, so squish them between some heavy objects. I knew those engineering books were good for something!

Print out your main text block. I should mention that we first tried to YUDU the text, hoping to emulate the nice texture achieved with it's cousin, the Gocco. Unfortunately, the text was too fine and didn't work out so well. I'm not saying it's impossible to get a fine line with the 220 mesh screen, just that we didn't. We only tried twice: first at a 10 minute exposure and again at a seven minute exposure. Neither worked, and instead of figuring it out we decided to forgo the YUDU in the interest of time. Printer it is!

After printing, Sak embossed the cards in the Cuttlebug, and used some spray glue to attach the embossed main text. Penga-Mom was a little sad that we didn't include any parent names in our text. Etiquette-wise, I didn't need to, but she brought up a good point -

"When I get an invitation I like to know the parent's names so I can greet them at the wedding."

Unfortunately, I had already printed everything out already, so there was no going back. But I added some information about our parents to our wedding website, so if anyone wants to know who's-who ahead of time, they can find it there!

That's it for the main body - looks like a vampire ball invitation, doesn't it? I have a feeling my teenage girly guests may be disappointed at the lack of undead heart-throbs at our shin-dig. I'm such a tease.

Cost breakdown thus far:

Black linen card stock: $42.26 for 250 sheets, or $22.65 for 134 sheets used.
white linen card stock: $32.79 for 250 sheets, or $3.28 for 25 sheets used.
double happiness stamp: $3.50
embossing gel: ~$4.00
embossing powder: ~$2.00
spray glue: ~$10.00
red washi paper: $3.00

Total so far: $48.43 or $0.48 per manvite for 100 total. Next we'll get jump into the pocket and see what's inside!
If you kept any of your old textbooks, what do you use them for?